Tuesday, May 27, 2008
greek coleslaw
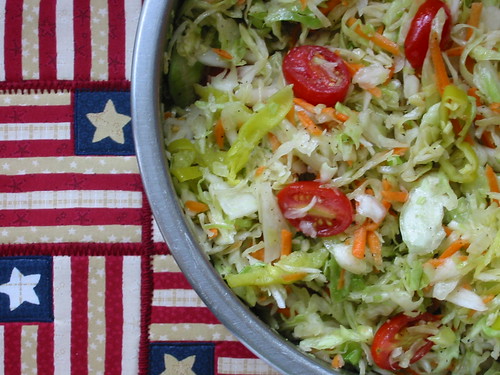
My apologies for my near week-long absence from posting. It was the result of a technology problem -- namely, a total inability to connect to the internet -- that occurred while I was home for a long Memorial Day weekend. Now that I'm back in Seattle, I can share with you a simple coleslaw that makes regular appearances at our summer family get-togethers. Very simple, but very good. In fact, usually only 3/4 of the slaw makes it to the table because everyone walking past the fridge tries to sneak a bite. OK, maybe not everyone. Just me. And The Athlete. Anyway, the point is that it is delicious and great for gatherings where you actually want to spend time with your guests rather than slave away in the kitchen. Plus, it earns bonus points for not being mayonnaise based.
[Cavender's Greek Seasoning comes in a yellow shaker and can be found in the spice section of any standard grocery store.]
Greek Coleslaw
A family recipe; actual origin unknown
Serves 8-10
32 ounces chopped cabbage or packaged coleslaw
8 ounces grape tomatoes, halved
4 ounces sliced pepperoncini
Extra virgin olive oil
Distilled white vinegar
Cavender's Greek seasoning
Garlic powder
4-6 ounces crumbled feta cheese
In a large bowl, toss together the cabbage, tomatoes, and pepperoncini. Add just enough olive oil to very lightly coat and then add vinegar to taste. Sprinkle liberally with Greek seasoning to taste. Add a few shakes of garlic powder. Stir in the feta cheese and chill before serving.
Continue reading...
Labels:
Salads,
Vegetables
Wednesday, May 21, 2008
spring wild rice salad
I'm sure I've waxed poetic here more than once about my love of Pike Place Market in Seattle. The produce is fresh, the flowers are gorgeous and cheap, and the surrounding restaurants and food stands have mouth-watering offerings. However, I don't think I have mentioned the nearby shops yet. (You were waiting with bated breath, weren't you?) One of my favorite places is Antiques at Pike Place. Perhaps their turnover is really high or maybe the vendors just make a point to rotate their wares frequently, but either way you can always count on seeing new trinkets and treasures every time you go. On my last visit two weeks ago, I was delighted to find a wheelbarrow out front full of random saucers and luncheon plates. (A food bloggers dream, for certain, since a new pattern breaks up the monotony of everyday plate pictures.) I want to move soon so it seems impractical to purchase more things only to pack them up in a few weeks, but I did pick out one plate that I just couldn't leave behind. What do you think?
I can't give a fair, all-encompassing review of this recipe because I didn't follow the directions...because I didn't read them very well...oops. And on top of my shoddy direction reading, I tried to take a few shortcuts. For example, I thought I could cut out some time if I just threw the asparagus in with the peas for the last minute of cooking. This would have worked like a charm if I had done it soon enough, but I waited until the peas were already thoroughly cooked, so that extra minute with the asparagus turned them into pea mush. Delicious pea mush, though. My bigger mistake, however, was failing to notice that I was only supposed to put half of the dressing on the salad. I, of course, didn't reference the recipe and dumped it all in, which left me with an overly lemony salad. Despite all my mistakes, though, the salad was still pretty good. I especially liked the addition of goat cheese and thought it really made the salad pop, so unlike Heidi's original recipe, I'm not listing it as an optional ingredient.
Spring Wild Rice Salad
A recipe from Heidi at 101 Cookbooks
Serves 8 as a side
1 1/2 cups wild rice, rinsed
3/4 cup dried yellow split peas
1 garlic clove, smashed and chopped
1/4 cup almond butter
Zest of one lemon
Scant 1/4 cup fresh lemon juice
2 tablespoons olive oil
Scant 1/4 cup hot water
Scant 1/2 teaspoon fine grain sea salt
1 bunch asparagus, trimmed and cut into 1-inch segments
1 bunch chives, chopped
1/4 cup goat cheese, crumbled
In a medium sauce pan bring the rice and 4 1/2 cups salted water to a boil. Reduce to a simmer. Cook for 40 minutes or until rice is tender and splitting open, stirring occasionally. Drain and set aside.
In a large sauce pan, bring 3 cups of water to a boil. Add the split peas and cook for 20-30 minutes or until tender. Drain, salt to taste, and set aside.
Whisk together the garlic, almond butter, lemon zest, lemon juice, and olive oil in a small bowl. Add the hot water to thin the mixture and then add the sea salt. Set aside.
Bring a saucepan full of water to a boil. Salt the water and add the asparagus. Cook until the asparagus is just bright and tender, about 1 minute. Drain and run under cold water to stop the cooking.
In a large bowl toss together the wild rice, peas, asparagus, and half of the almond dressing. Season with salt to taste and add more dressing if needed. Serve topped with chives and crumbled goat cheese.
Continue reading...
Labels:
Salads,
Vegetables
Thursday, May 15, 2008
rhubarb cornmeal cupcakes with cardamom frosting
I wasn't kidding when I said I've been thinking about rhubarb ever since I was treated to Tom Douglas's doughnuts and seasonal jam a while back. Not surprisingly, I wanted to stick it in a cupcake. I let the thought simmer in the back of my brain for a few weeks and eventually my inner cupcake compass led me down the path of rhubarb + cornbread + cardamom. It might sound unusual, but let me tell you, this combination is worth trying. (Trust me -- all the cool kids are doing it.)
Like many of my cupcake adventures, however, this one was not without its trials. For my first attempt at a cornbread cupcake I used a medium grind cornmeal. No good. Crunchy, dense, and decidedly un-cupcake like. For the second go around, I took a shot in the dark at the grocery store and purchased a box of Alber's cornmeal. It didn't give any information about the size of the grind, but when I shook the box it sounded soft (yes, sounded soft). It was also labeled as "degermed," so I bought it in hopes that the germ was really what made my first batch so crunchy. Fortunately, I was right. Cornbread Cupcakes Take Two came out with a soft crumb, just enough texture to let you know the cornmeal was there, and a distinct cornbread flavor.The rhubarb compote also turned out to be a winning recipe. (I can imagine it would be good served with shortcake or ice cream as well.) Mine had more juice and less of the syrup that the recipe refers to, so in order to keep it from sogging down my cupcakes, I put the rhubarb in a strainer and pressed it lightly to extract the excess juice. (I used the reserved juice to garnish my cupcakes and give them their pretty bejeweled appearance.)
To top the cupcakes, I adapted my standard buttercream recipe by adding a little cardamom. Much to my delight, the cardamom was right at home with the rhubarb and cornbread flavors. If you've made my buttercream before, though, you know it is definitely sweet. The sweetness of this cupcake isn't as dessert-y as most cupcakes, so unless you want the frosting to be the dominant player, a light layer will suffice. (Even I used a bit too much.)[Postscript: The cupcakes seemed a little dry to me the next day, so I would recommend serving them within 24 hours.]
Rhubarb Cornmeal Cupcakes with Cardamom Frosting
Makes about 12 cupcakes
Cornmeal Cupcakes
A Dulcedo original
1 cup degermed yellow cornmeal
2/3 cup all-purpose flour
1 teaspoon baking powder
1/2 teaspoon salt
1/2 cup (1 stick) unsalted butter, softened
1 cup granulated sugar
3 large eggs
1 teaspoon vanilla extract
1/2 cup nonfat vanilla yogurt
Rhubarb Compote
Adapted from a recipe from Bon Appétit - March 2008
1 cup Pinot Noir or Cabernet Sauvignon
1/2 cup plus 1 tablespoon sugar
3 1-inch-long strips orange peel (orange part only)
2 1-inch-long strips lemon peel (yellow part only)
3 cups 1/2-inch pieces fresh rhubarb (about 1 pound trimmed)
Pinch of salt
Frosting
Adapted from a recipe by Cheryl at The Cupcake Bakeshop
1/2 cup butter, room temperature
3-4 cups sifted powdered sugar
1 teaspoons vanilla
1/8 cup light vanilla soy milk
1/8 teaspoon cardamom
To make the cupcakes:
Preheat oven to 350 degrees F. In a small bowl, whisk together the cornmeal, flour, baking powder, and salt. Set aside.
In the bowl of an electric mixer fitted with the flat beater, beat the butter and sugar together until light and fluffy. Add the eggs one at a time, beating well after each addition. Beat in the yogurt and vanilla. Add the flour mixture in two additions, mixing until just incorporated and there are no streaks of flour left in the batter.
Fill your cupcake containers of choice 3/4 full and bake for 20 minutes, or until a toothpick inserted into the center comes out clean. Transfer cupcakes to a wire rack to cool completely before filling, frosting, or garnishing as desired.
To make the compote:
Combine wine, sugar, orange peel, and lemon peel in heavy large saucepan. Bring to boil, stirring until sugar dissolves. Add rhubarb and salt and simmer until rhubarb is tender but still retains its shape, about 9 minutes. Using slotted spoon, transfer rhubarb to shallow dish, arranging in single layer. Boil wine syrup in saucepan until slightly thickened and reduced to between 1/2 and 3/4 cup, about 5 minutes. Pour syrup over rhubarb and cool, then cover and chill until cold.
Compote can be made up to 3 days ahead. Cover and keep chilled.
[To fill the cupcakes like I did, cut a cone shape out of the top of the cupcake, add about a teaspoon of the filling, and replace the cone "hat."]
To make the frosting:
In the bowl of an electric mixer, beat the butter at medium-high speed until creamy. Add half of the sifted sugar, the vanilla, the milk, and the cardamom. Beat until combined. Gradually add the remaining sugar until the frosting reaches your desired consistency.
[To give my cupcakes their bejeweled appearance, I drizzled some of the juice from the rhubarb compote over the frosting.]
Continue reading...
Labels:
Cakes and Cupcakes,
Desserts
Monday, May 12, 2008
mango sorbet
Hi, Grandma. It's me again. Grandma, do you remember when you gave me your ice cream maker a few years ago? That newer electric one that you never used? Well, I was awfully glad to receive it. I took it back to South Bend with me and tucked it away, waiting for an opportunity to use it (since ice cream makers aren't everyday electrics for the lactose intolerant). That opportunity didn't come while I lived there, so when it came time to move to Washington, I packed it up and brought it with me, certain that I would eventually have a chance to put it to use. Well, last week I got tired of waiting, so I decided to use it to make a sorbet instead (all the frozen goodness, no nasty side effects). A mango sorbet, in fact, since mangoes were on super sale at the grocery store. So I bought my mangoes and had everything ready to go, but when I pulled your ice cream maker out of the box, half the parts were missing! I guess that explains why you never used it.
After carting that thing all over the country, what could I do but laugh at the absurdity of it all? Well, laugh and buy my own ice cream maker, of course. So here is the mango sorbet recipe that has been a week in the making. The sorbet was fine, but as it turns out, I'm actually not a huge fan of mangoes. (Oh, the irony....) However, if you do like them and want to give this recipe a spin, here's what you should know: Unless you like your sorbets super sweet (as in, just this side of cloying), you'll want to take the sugar factor down a notch -- perhaps by substituting more lime juice for some of the simple syrup since, at only 3 tablespoons, the lime flavor isn't detectable in the final product anyway. Also, the recipe only made enough sorbet to fill four shell halves, but I'm not sure that serving the sorbet in the shells is a great idea anyway because it makes the serving size about three times larger than what the average person would actually want to eat.Mango Sorbet
A recipe from Gourmet - July 1997
Makes 6 cups
4 ripe mangoes (about 3 1/2 pounds total)
1 cup water
1 cup sugar
3 tablespoons fresh lime juice, or to taste
In a saucepan bring sugar and water to a boil, stirring until sugar is completely dissolved. Cool completely. Cover and refrigerate until ready to use. (Syrup may be made up to 1 week ahead.)
Line a baking sheet with plastic wrap.
Wash and dry mangoes. Using a sharp knife, remove the 2 flat sides of each mango, cutting lengthwise alongside pit and cutting as close to pit as possible so that mango flesh is in 2 large pieces. With a spoon carefully scoop flesh from mango sides into a blender, leaving shells intact. With a knife cut remaining flesh from pit and add to blender. Add syrup and lime juice to blender and purée until smooth. Put mango shells on baking sheet and freeze while making sorbet.
Freeze mango purée in an ice-cream maker. Scoop sorbet into frozen shells, mounding slightly, and smooth surfaces. Freeze filled mango shells at least 6 hours, or until frozen hard. Frozen sorbets in shells may be wrapped individually in plastic wrap and kept in freezer 1 week.
Continue reading...
Labels:
Desserts
Thursday, May 8, 2008
vegetarian blt
I live in a school zone, so it's not uncommon for me to see a patrol car or two monitoring traffic on the road in front of my apartment when I leave for work in the morning. Normally they park on the side of the road or on adjoining side streets, but yesterday I pulled out of my garage to find one sitting at the end of my driveway. The driveway is somewhat narrow, so I assumed that if I pulled up behind him, he would move out of the way so that I could leave. After idling halfway up the drive for a few moments, it was clear he wasn't paying an ounce of attention to me, so I cautiously pulled up beside him. The officer in the squad car was targeting cars with his radar gun like he was John Wayne in some sort of shoot-'em-up Western movie, and he was so engrossed in the theatrics of it all that he didn't even seem to notice that he was now shooting through my car at all the passing vehicles. I'm glad he enjoys his work. I'm also glad that when he flipped on his flashing lights as I was leaving, it was to pull over someone else.
Vegetarian BLT = beans + lettuce + tomato. (I know, don't quit my day job, right?) I've been really into fresh green beans lately, and not content with eating them warm, I decided to play around with some ways to use them raw. I also really like sandwiches. I'm sure you can see where this paragraph is going, so I'll just cut to the chase: Don't use Miracle Whip here; it's "tangy zip" is made for lunch meats, not heirloom tomatoes. If you're feeling ambitious and want something other than mayo, try using this sun-dried tomato dip as a spread. I vote for the mayo, though. Simple is good...and oh, so satisfying.[This post was submitted for Sandwich Festival 2008 and Vegetables, Beautiful Vegetables.]
Vegetarian BLT
A Dulcedo original
Serves 1
2 slices whole-wheat bread
1-2 tablespoons real mayonnaise
Handful of ripe baby heirloom tomatoes, halved
Handful of fresh green beans, trimmed
Handful of lettuce or other greens
Salt and pepper
I feel like the assembly of a sandwich this simple should be self-explanatory, but for those who are new to planet earth: Spread 1 tablespoon of mayonnaise on each slice of bread. Top one slice of bread with the green beans, tomatoes, and then season with salt and pepper. Add the lettuce and then top with the remaining slice of bread.
Continue reading...
Labels:
Vegetables
Sunday, May 4, 2008
chocolate custard cake with raspberry-pomegranate sauce
I am a nice girl, really. Nice, at least, until you call and tell me that the cake I just spent my afternoon making is not welcome at your restaurant. You see, I expect that if I make a reservation (well in advance), fully disclose that I intend to bring a small cake, and ask you to let me know if that will be a problem, you will do so more than 1 hour prior to my reservation. So when you, dear hostess at Bellevue's well-known Seastar restaurant, call and tell me that your "house policy" doesn't allow homemade cakes, I will quickly point out the grave customer service error you have just made and, as you now know, I won't mince any words. Yes, I'll hold while you try to figure out what to do with me, the angry customer on the phone. I'll also smile and reply with a polite "thank you" when you return and say, "Ma'am, your cake won't be a problem." I didn't think so.
David Lebovitz refers to this cake as "Chocolate Idiot Cake" because it's practically foolproof and, really, anyone can make it. I opted to rename it only so that it is clear that the texture of the cake doesn't actually resemble regular cake at all. It is dense, ultra chocolaty, and very, very rich. So rich, in fact, that after three or four bites, no matter how much you like chocolate, trust me, you're full. Also, because it is so rich, it really benefits from some sort of accompanying sauce. I obviously chose to make a raspberry-pomegranate sauce, but you could also use, as David recommends, cream anglaise or ice cream.Chocolate Custard Cake with Raspberry-Pomegranate Sauce
Chocolate Custard Cake
A recipe from David Lebovitz
Makes one 9" cake or three 4.5" cakes
10 ounces high-quality bittersweet chocolate, coarsely chopped
14 tablespoons (7 ounces) unsalted butter, cut into pieces
5 large eggs
1 cup sugar
Pinch of salt
Raspberry-Pomegranate Sauce
Adapted from a recipe from Bon Appétit - October 2006
Makes about 2 cups
2 cups pomegranate juice
1 12-ounce bag frozen unsweetened raspberries (unthawed)
1/8 cup sugar
1/4 cup honey
To make the cake:
Preheat the oven to 350 degrees F. Butter the springform pan(s) and dust with cocoa powder, tapping out any excess. If you suspect your springform pan isn't 100% water tight, wrap the outside with aluminum foil, making sure it goes all the way up to the outer rim.
Melt the chocolate and butter in a double boiler (or microwave), stirring occasionally, until smooth. Remove from heat.
In a large bowl, whisk together the eggs, sugar, and salt, then whisk in the melted chocolate mixture until smooth. Pour the batter into the prepared springform pan and cover the top snugly with a sheet of foil. Put the springform pan into a larger baking pan, such as a roasting pan, and add enough hot water to the baking pan to come about halfway up to the outside of the cake pan.
Bake for 1 hour and 15 minutes. You'll know the cake is done when it feels just set, like quivering chocolate pudding. If you gently touch the center, your finger should come away clean.
Lift the cake pan from the water bath and remove the foil. Let cake cool completely on a cooling rack. Once cool, remove the sides of the springform pan.
Serve thin wedges of this very rich cake at room temperature. Cake can be wrapped and stored in the refrigerator for 3-5 days.
To make the sauce:
Bring juice to boil in large, heavy saucepan. Reduce heat; simmer until reduced to about 3/4 cup, about 35 minutes. Mix in raspberries and sugar. Simmer until reduced to about 2 cups, stirring frequently, about 20 minutes. Stir in honey and bring the mixture back to a simmer. Remove sauce from heat and allow to cool. Cover and store in refrigerator until ready to use (can be made one day ahead).
Continue reading...
Labels:
Cakes and Cupcakes,
Desserts,
Jams and Sweet Sauces
Subscribe to:
Posts (Atom)


